
Your only equipment is a loop of string. This should be smooth, thick enough not to break when you tug it and not stretchy. You tie it in a loop, and the knot should not be too big, such as a reef or square knot. The length of string to make the loop should be long enough (but not too long!) I have two strings supplied with books of string figures. There is no reason to get such a special string, as ordinary string works fine, but these help to show the length. The smaller loop is made from a length of string 150 cms (58.5 ins) plus enough to make the knot. When simply looped round my hands and my hands pulled apart, the hands are 72 cms (28 ins) apart. The longer loop is made from a length of string 174 cms (69 ins) plus enough to make the knot. When simply looped round my hands and my hands pulled apart, the hands are 86 cms (34 ins) apart. That shows that there is a variation in loop size. The sizes above are just given as examples. Try various sizes, and see what's right for you. The "pulling hands apart" seems quite a long way at first, but remember that the string will be looped in more complicated ways while making the figures. If the loop is too small, then it will be hard to make some of the movements. If too big, then your hands will be too far apart.
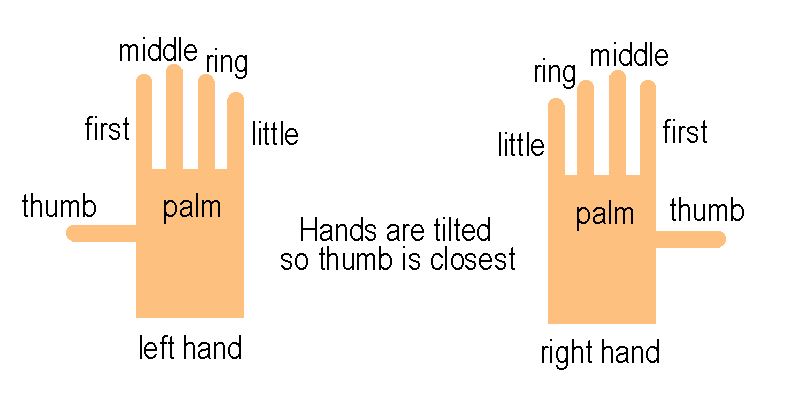
The description of the string figures use the following finger names:
Here is a comon start position. The string is hooked round the thumbs and little fingers, and runs in front of the middle fingers.

The palms are facing each other, slightly tilted away from each other, with thumbs upwards. For my diagrams, I will show the hands flat like this, as it is clearer and the fingers don't obscure each other. Your hands are shown as seen by yourself. Here is the position of the hands without the string. Remember that the hands are tilted, so the thumb is higher, and closer to you, and the little finger is lower down, and further away from you.
When making a movement in the string figures, the string often becomes loose, and hangs down in loops between the hands. The normal position after a movement is to hold the hands apart with the string taut between them. If not, the instructions will warn you.
You will find it easier if the loop of the string lies as far down the finger as possible, otherwise it might slip off the top!
When moving the hands, make sure that the loops on fingers don't slip off. You can press your fingers together to stop that happening.
Usually, the fingers are moved to pick up the loops. Sometimes you use the fingers of one hand to manipulate the loops on the other hand, even though the first hand has loops of its own. Sometimes you use your mouth (or rather your teeth) to manipulate the loops or strings because both hands are in use. I suggest what to do, but you may prefer another way. Use any method that works!
When starting on a new figure, follow the steps carefully until you achive the final result. If you make a mistake, it is probably best to start again. Once you have managed to get to the end correctly, try it again and again. You will find that your fingers start to move more fluidly, until the whole sequence flows together. Doing it several times helps to fix it in your memory as well.
The final figure sometimes takes a little effort to show. The strings may be too tight, or there are loops. If that happens, try rubbing the hands together, or pulling the loops through. Sometimes the figure is upside down! Then you tilt your hands away from you, so the audience can see the figure even if you can't. Usually the final shape has the hands pulled apart and the strings taut. For a few, the figure lies in loops of string, and if you pull your hands apart, the figure disapears! (The instructions will warn you if this is so.) You may need to manipulate your hands to make the figure appear, perhaps by lifting thumb or finger away from the rest. Experiment!
I think that string figures do not have a bias towards left or right handed. I am right handed. I have tried out all the figures and steps myself. I am not sure if my handedness have influenced my descriptions. If so, I apologise! By all means try reflecting the descriptions if it helps you.
What you do need is flexible fingers, with independent movement, on both hands!
© Jo Edkins 2019 - return to index