
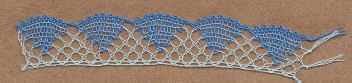
This has a footside (straight edge for sewing onto material) and a headside (decorative edge, may be curved, such as here).
| Pattern: |  |
 |
Bobbins: 9 pairs (7 pairs one colour, 2 pairs a different colour)
Style: Torchon
Stitches:
twist pair
half stitch
cloth stitch
cloth stitch and twist
Details:
Torchon ground (grey)
fan headside (red)
solid cloth stitch
twisted footside (grey)
Description: Hang bobbins as shown in the pattern. There are 3 pairs on the footside edge, and the 2 differently coloured pairs are on the headside edge. from each top pin.Twist the 7 pairs of the same colour (not the headside coloured pairs).
Start working the lace from the top right corner, twisted footside and Torchon ground, following the diagonal lines in the pattern. Do not use the pins framing the pink area - stop short of them. (You are going to need to use these when doing the fan itself).
The fan is made of cloth stitch, but not quite the same as the block of cloth stitch in the cloth sampler. The rows gradually increase in length, as pairs get added from the right, until you get to the point. Then they gradually decrease in length until by the end of the fan, there are only 2 pairs again (which should both be coloured). See the fan headside description for a more detailed explanation, and animation. A very common error is to forget to pick up a pair for a row, or pick up two, or not drop a pair off, or drop off two pairs. Then you have more or less than two pairs at the end. Only solution, undo what you've done, find the mistake, and redo it!
The other difference to the samples pattern is that you don't have a straight down edge, but a curved one. So the passives should really bow outwards to fill this space. To do this, keep the passive pair bobbins to the left of the lace (so the threads tend to lie in that direction). When tightening the threads don't over-tighten! Pull out any little loops you see, but don't pull this gentle curve of the passives into a straight down line. The fan headside description covers this.
There are various pairs leaving the fan, heading for the next bit of Torchon ground. Twist all these pairs before starting the Torchon ground. (If you prefer, you can twist each pair as it leaves the fan. If you do this, check at this point that you remembered to twist them!) The reason for these twists is that the threads in a pair tend to separate if not twisted. Most lace stitches end in a twist, but cloth stitch doesn't. So when pairs leave cloth stitch, they should be twisted before the next stitch.
One of the coloured pairs are workers for this fan, and so colour the whole fan. The other coloured pair runs along the edge of the fan. Then they swap over for the next fan. They are the same colour, so you don't notice this!

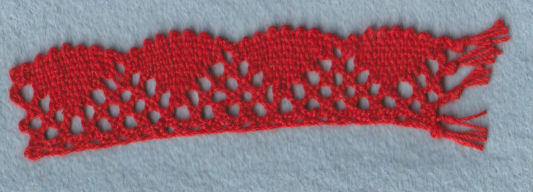
Close up of the lace, so you can see the working in more detail
This is a traditional piece of lace, suitable for trim, by sewing onto fabric, such as a handkerchief or clothes. For proper trim, you would need to work a lot of it, and this is a problem on a simple pillow. You would need a special pillow such as a bolster, a block pillow or a roller pillow.
British lacemakers tend to pin their patterns so the footside is on the right and the headside on the left. European lacemakes have footside on the left and headside on the right. It makes absolutely no difference to the lace! It's just part of different lace traditions, and I thought you'd like to know. If you have an insertion (like the footside pattern) then you have to be able to work the footside on both sides. There is lace with headsides on both sides too.
This pattern using a larger pattern and much thicker thread

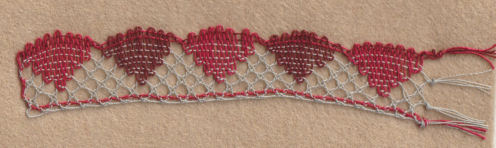
This pattern with the two outer pairs red and purple. The outer colour colours the fan, then the two pairs swap over at the end of the fan. The passive pair in the footside is coloured as well.

Click here for more on how to make lace.
© Jo Edkins 2019 - return to lace index