
Gravenmoer is a small village north-east of the city of Breda in the south of The Netherlands. The Gravenmoer diamond is similar to a half stitch diamond, but is subtly different. It is worked in a completely different way. See pattern 34.
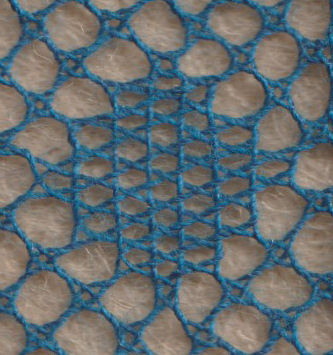
Gravenmoer diamond with vertical threads (left), compared with half stitch diamond with horizontal threads (right)

The pattern for a Gravenmoer diamond is like any other diamond.
The following diagram avoids the complexities of the individual stitches by showing each pair of threads as a single line. Where one line crosses another, you should work it in half stitch.
If you are used to normal diamonds, this is going to confuse you horribly! Firstly, you work all rows from left to right. Secondly, there are two rows per left-hand pin, but only one per right-hand pin! Thirdly, once you run out of pins on the right, the diamond is finished, even though you only have got half way through the pins on the left. Fourthly, despite all this, the diamond is left/right symmetrical (so you could work all rows from right to left if you really wanted to!) As this is worked in half stitch, the following diagram does not give the pattern of the threads. It is a description of how you work it. (I tried to draw a pattern of how the threads went. Oh help!)
|
|
Working: The blue numbers describe the pins. For a Gravenmoer diamond, it is extremely important which is the start and end of each row, and it is not obvious. So I am giving these pin numbers, and 'l' means left, 'r' means right. Remember that all stitches are half stitch, and that you are always working left to right.
Row A: One stitch at pin 1
Row B: Two stitches from pin 1 to 2r
Row C: Four stitches from pin 2l to 3r
Row D: Five stitches from pin 2l to 4r (please note - this is from the same pin as previously, but to a different pin)
Row E: Five stitches from pin 3l to 5r (please note - both different pins from previously)
Row F: Four stitches from pin 3l to 6r (from the same pin, to a different pin)
Row E: Four stitches from pin 3l to 7 (different pins) - this is the bottom edge of the diamond, so put pins in each pinhole.
© Jo Edkins 2016 - return to lace index


