
This could be used as a Christmas tree decoration. Click here for more Christmas decorations.
Pattern:

Bobbins: 17 pairs (3 silver pairs, 14 blue pairs)
Style: Torchon
Stitches:
cloth stitch
half stitch
cloth stitch and twist
twist pair
Details:
Torchon ground (grey)
cloth zigzag (red)
single twisted footside (grey)
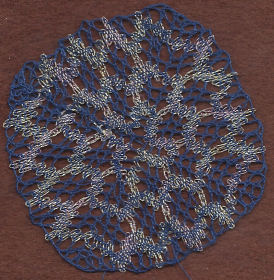
circular mat
how to finish
Description:
Follow the links above for explanation of how to work the different parts of the lace.

The start is along a diagonal (although it looks horizontal above!), so one pair starts at each pin, and two at the edge. Above, I have marked the position of the false pins.
Click here for how to finish an edge. Remember to leave the first two rows of pins in the pattern in place, and push them up to their heads. Remove other pins to reuse at the end as usual. You will find that if you don't, the threads will catch on the pins as you turn the pillow.
This type of shape seems to have no straight part, but in fact you work it exactly the same as a square mat. Work a quarter, down to the next dark grey line, then turn the pillow to work the next quarter. Click here to see how to work it. You will need to use a pillow that you can get at from all sides.
This pattern has three cloth zigzags, which are coloured by their worker pairs. These are all the same colour (silver metallic thread) - you could make them different if you wanted. The rest of the pairs are dark blue, to make a good contrasting background.
The mat is made up of four quarters. It is essentially a square mat, with the grid distorted into a circle. Normally, for this type of mat, you only work lace in the four quarters, and not between the last row of one quarter, and the first row of the next. For the Torchon ground in this pattern, the pairs are taken across to the new quarter as before. However, for the zigzags, it is different. You still finish off the end of the zigzag before the dark line. Then you do a couple of rows of cloth stitch in that gap. There are pin holes marked for you to do this. Then start the next zigzag in the next quarter. The point of this is to fill in between the two quarters, so the zigzag looks continuous. You can't make it really continuous by working it as a single zigzag from one quarter to the next. The direction of the workers is different, and it just won't work. But if you fill in the gap between the zigzags with some cloth stitch, it will look continuous, which is good enough. However, you must make sure that the silver workers (or whatever colour you are using) ends up at the right point to start the next zigzag, which is on the outer bit of the solid strip. If the silver workers are on the inside instead, then do another row of cloth stitch to get it in the right place.
© Jo Edkins 2016 - return to lace index