

This is based on a Maltese lace mat (see bottom of page). This mat also inspired pattern 233.
Pattern:

Bobbins: 20 pairs (4 blue, 16 green)
Style: Torchon
Stitches:
half stitch
cloth stitch
cloth stitch and twist
plait
twist pair
Details:
Maltese headside (blue, pink and grey)
cloth diamond (red)
Torchon ground (grey)
rose ground (green)
twisted footside (grey)
corners
how to start and finish
Description:
Follow the links above for explanation of how to work the different parts of the lace.
This is a square mat with a hole in the centre, in other words, an edge. It is made up of straight pieces of lace (with diagonal starts and ends).

The start is along a diagonal, so one pair starts at each pin, and two at the edge. Usually, I mark the position of the false pins. However, there is a problem with this particular pattern. There are stitches which cross the diagonal start line, in the rose ground. So here the marked start should be the true start, not false pins. Hang the bobbins from them to start, but do not remove the pins to pull the threads through! That means that the end of the lace could be a little tricky, as you will need these pin holes again.
Click here for how to finish a mat. When you get to the end, remove the first row of pins, work the last row of pins (which use the same pin holes) then tie off as usual.
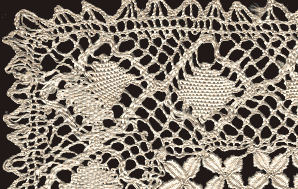
The mat in this photo came from my grandmother, who was born in the 19th century. The lace is made of cream silk and you can see the Maltese cross in the middle, so it is almost certainly Maltese lace. She stayed in Malta for a short time. It was made in several pieces and then sewn together - the edge, the four petalled flowers, and the cross with the flowers in the centre. I was interested in the edge. It is a simple yet striking design. The problem was the corner. Some stitches, like Torchon ground or rose ground will go round corners, but other designs have to be interrupted at the diagonal, then turned and started up again. This has happened here with the corner diamonds. They have tried to disguise it, which hasn't really worked.
But I did like the way that two pairs of threads are run together, rather like a gimp, around the diamonds, high-lighting them. I thought I would try to design a mat edge with better corners but using the same idea. I used rose ground in the corners, because you can do two units belonging to one side, then turn the pillow and do the other two units in the next side. This was the inspiration for my pattern (top of page).

Normally a gimp is a single thicker thread which is used to surround a pattern to high-light it. Here the single thread is replaced by four threads (two pairs) in pale blue thread, which are worked through the dark green threads in cloth stitch. When they change direction, they are worked through the pair meeting them in cloth stitch, pin, cloth stitch. There are two groups of these gimp threads. When they cross, they are worked in cloth stitch. This pseudo-gimp of two pairs explains why there are two pairs starting at a pin in the middle of the diagonal at two points.
© Jo Edkins 2017 - return to lace index