

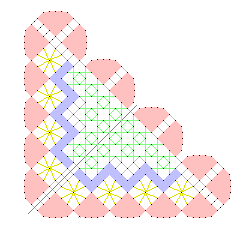
A pattern for decorating the corner of a plain cloth mat or handkerchief. See Triangles for other patterns.
Pattern:
Bobbins: 18 pairs
Style: Torchon
Stitches:
half stitch
cloth stitch and twist
cloth stitch
twist pair
plait
reef knot
Details:
cloth fan (red)
half stitch zigzag (blue)
Torchon ground (grey)
rose ground (green)
triangle shape, from corner
sewing lace onto fabric
Description:
Follow the links above for explanation of how to work the different parts of the lace.
The diagonal start is easier with false starting pins, which are provided. The pattern is made of two parts, with the pillow turned halfway through - see making a triangle shape, from corner. The start and the finish make a straight line. This is what is sewn onto the fabric.
This has headside (fans), running along all edges. How do we do that? A corner triangle expects to start and end as a diagonal line within the lace - probably as a straight line. In fact, ordinary strip lace can start with headsides - see other ways of starting. The trick is to start between the ground and the headside:
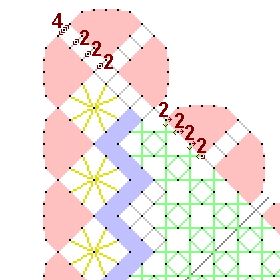
This diagram shows where the start is, and how many pairs start at each pin. This is twice as many as you might expect, since at each pin, one of each pair goes downwards into the lace, and the other pair goes upwards to work the fan. Even worse, some pins that you might expect to start a pair at have no pair at all. This is because the pair has returned from working headside, and dives into the ground at this point. Then you start having two pairs at each starting pin again... I have given the direction of each new pair's threads to hopefully explain what is going on.
The finish has a similar problem. The diagram is rotated compared to the pattern, as by this point, you will have turned the pillow.

Here, the arrows show where pairs arrive at a pin, and there is nowhere else for them to go! So you need to knot them off at this point. These must be reef knots, of course, to be as inconspicuous as possible. But they take place within the lace, with pins surrounding each knot! The best thing is to work all the lace, and as each pair comes to its end point, carefully push it to one side. Then push the pins in up to their heads, so you can see what's going on. It might be best to leave the pair's last pin up before tying the knot, as reef knots (square knots) are easier to tie round a pin. But push it down afterwards. When all threads have been tied off, remove all the pins (using a thumb nail orpin lifter if necessary!), then trim the surplus threads. See other ways of finishing. You can see from my photo at the top that I've made a bit of a mess of tying off!
I haven't sewn on this example myself, but the photo below gives an idea of what it might look like. You can see how one line of scallops overlap the fabric.

© Jo Edkins 2016 - return to lace index