
This could be used as a Christmas tree decoration. Click here for more Christmas decorations.
Pattern:
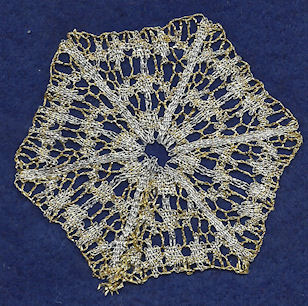
Bobbins: 14 pairs (5 silver pairs, 9 gold pairs)
Style: Bucks Point
Stitches:
cloth stitch
cloth stitch and twist
half stitch and twist
twist pair
Details:
footside with no passives
Bucks Point net (grey)
cloth strip (red)
cloth zigzag (red)
solid cloth stitch (blue)
hexagonal mat
how to finish
Description:
Follow the links above for explanation of how to work the different parts of the lace.

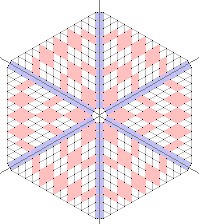
The start is along a diagonal, so one pair starts at each pin, and two at the edge. Above, I have marked the position of the false pins.
Click here for how to finish an edge. Remember to leave the first two rows of pins in the pattern in place, and push them up to their heads. Remove other pins to reuse at the end as usual. You will find that if you don't, the threads will catch on the pins as you turn the pillow.
Click here for how to work a hexagonal mat. Click here for how to finish a mat.
Usually there is no working between the different parts of a hexagonal mat. When you reach the dark grey line, you turn the pillow and start on the next bit. That leaves a gap in the finished lace, crossed with simple twisted pairs. Here, this area is filled in, to make the arms of the snowflake. When you reach the end of one sixth of the pattern, take the pair nearest the centre (not the edge pair), and work 4 rows of cloth stitch all the way to the centre, pin, and back to the outer edge, twice.
This pattern has two colours, silver for the snowflake and gold for the background. The silver pairs are workers for the shapes which make up the snowflake, and so colour them. These shapes touch, so there is not a problem getting the right colour to be workers for the next shape. The main problem is the workers for the snowflake arms, that part of the pattern between one sixth and the next. In other snowflake designs, these workers are taken from the edge, where there are two pairs. However, none of the pairs at the edge are the right colour. So the worker pair for the snowflake arm needs to be taken from the centre - on the right-hand side of where you're working. This does, unfortunately, tend to leave rather a ragged centre to the snowflake. Of course, if you only use one colour throughout, then you can have an edge pair for these arms, and that will give a neater effect.
© Jo Edkins 2016 - return to lace index