

A pattern for decorating the corner of a plain cloth mat or handkerchief. See Triangles for other patterns.
This piece has fringes. You could start and finish it in a more conventional way if you don't like the fringes (which, I must admit, didn't work very well!)
Pattern:
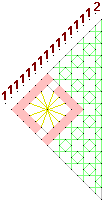
Bobbins: 17 pairs
Style: Torchon
Stitches:
half stitch
cloth stitch and twist
cloth stitch
twist pair
overhand knot
Details:
cloth zigzag (red)
Torchon ground (grey)
rose ground (green)
rose ground edge (green)
12 legged spider (yellow)
triangle shape, from strip
sewing lace onto fabric
Description:
Follow the links above for explanation of how to work the different parts of the lace.
This is just a strip of lace, but started and finished on a diagonal to give a triangle shape. The diagonal start is easier with false starting pins, which are provided. The start and finish is a line of Torchon ground to provide an edge.
I started and finished this lace in a different way. Lace sometimes looks attractive if you knot the ends of the finished threads with overhand knots to make a fringe. However these corners would look a bit weird if they started with a smooth edge, but finished with a fringe. So I decided to start them with a fringe as well. I took the bobbins that I cut off when making pattern 250, and knotted them together with overhand knots. Then I hung these from the starting pins (which are false pinholes) and carried on in the normal way. It was a bit tricky getting the knots to settle in the right place, and I'm not too sure that this idea works! But I give you my mistakes as well as successes for you to learn from. Start and finish it in the normal way if you prefer, or perhaps you can work out a better way to start with a fringe!
I haven't sewn on this example myself, but the photo below gives an idea of what it might look like.

© Jo Edkins 2016 - return to lace index