
This could be used as a Christmas tree decoration. Click here for more Christmas decorations.

Pattern:
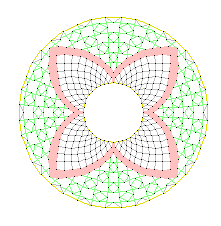
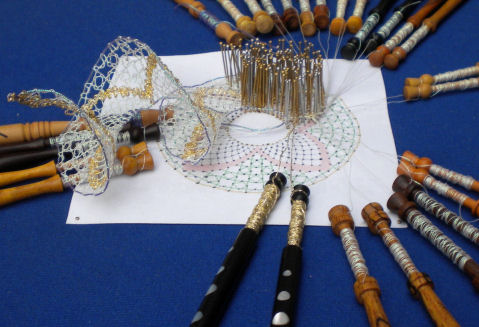
Bobbins: 13 pairs (12 gleamy white, 1 gold) + 2 gimps
Style: Torchon
Stitches:
half stitch
cloth stitch
cloth stitch and twist
gimp (yellow)
twist pair
Details:
rose ground (green)
Torchon ground (grey)
cloth zigzag (red)
how to work a roundel
how to work a helix
Description:
Follow the links above for explanation of how to work the different parts of the lace. There are two gimps, along the outer and inner edge of the lace. This was to give the basic helix shape more strength (I don't know if this was necessary, but this is the first helix I've made). Both gimps start at the tip of the lace. One gimp is included as part of the first slant of the zigzag, which means that it ends up on the inner edge. The other gimp is already on the outer edge. At the end, the inner edge gimp needs to be worked back to the outer edge again. It is probably a good idea to start both gimps as a bobbin oair, and to knot them together at the end. It might be possible to pull either gimp out, otherwise, which would be disastrous! If you want, you can replace these gimps by pairs instead. I recommend twisting the outer pair more than usual, for extra strength, though.
The worker pair uses a lot of thread! I wound on about 2 yards for each bobbin (finger tip to finger tip) and they ran out about half way through. So I had to add more thread using the parallel thread technique.
For the rest of the lace, the worker pair for the zigzag is a different colour. This colours the whole zigzag.

The start is along a diagonal, so one pair starts at each pin. Above, I have marked the false pins.
This is basically a roundel (click here to see how to work a roundel). However, when you have worked your way round the circle to get back to where you started, you do not stop and connect the end to the start. Instead, you fold the old lace out of the way, and carry on working along the pattern. This will have been used already, but this doesn't matter (unless it gets torn!) You have to decide how much to work. I did over 2 turns. When you decide to stop, you tie off the pairs just like a normal strip. The lace will happily stay in its circular form, flat, but with more than one layer. However, when you pick up the top point (perhaps by a thread through it), it forms a helix.
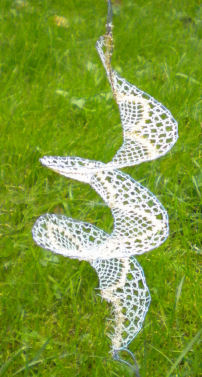
I said "fold the lace out of the way" while working. In fact, much to my surprise, it started making a helix naturally!
This may be because I used gleamy thread (for its decorative effect) and this can be stiff. I also twisted pairs a lot, for example, between each Torchon ground stitch. The worked lace must lie above the bobbins (so it doesn't get in the way) and this gave a slight bend which started off the helix, and the stiffness of the threads kept it so.
Structurely, the helix works surprisingly well. I recommend a tie (a piece of thread) at top and bottom. This means that if the spiral starts to droop round the edge, you can hang it upside down for a bit until it recovers. It looks the same, either way up!
© Jo Edkins 2017 - return to lace index