
Pattern:

Bobbins: This is three separate patterns joined together with sewings (or you can do it all at the same time).
Outer roundel has 19 pairs (with 7 pairs coloured for rose ground).
Middle roundel has 14 pairs (with one pair heart colour).
Inner roundel 17 pairs
Total 50 pairs
Style: Torchon
Stitches:
half stitch
cloth stitch
cloth stitch and twist
insert a bead
sewing (using crochet hook)
Details:
rose ground edge (green)
rose ground (green)
double Torchon ground (grey)
Torchon ground (pale blue)
half stitch diamond (blue)
cloth heart (red)
cloth zigzag (ref)
footside without passive
how to work a roundel
how to finish
Description:
Follow the links above for explanation of how to work the different parts of the lace. You will need a pillow large enough to take the pattern or something like a block pillow, and some clever positioing on the pattern, so you can turn it. As you work round the roundel, you turn the pillow.
You can either work one roundel at a time (as described below) or you can work the whole thing at the same time, but you'll need 50 pairs of bobbins!
The inner roundel has Torchon ground and a narrow zigzag. (You can colour the zigzag shape if you want, by including a different coloured pair as worker when starting). The innermost hole has rather cluttered stitches round it! Technically, there is a footside without passive, as all those stitches make it quite strong. You will need to leave the first two rows of pins in place, so you can later join the finish to the start. Work the complete roundel, leaving pins where the pink marks are, as these will be used for sewings, and you want to get them to stay in the right place! You will need to push all these pins in up to their heads, or they will catch on threads. Join start to finish, tie off the pairs, and cut off the bobbins (not too close to the knots! You don't want them to come undone.)
Now start the middle roundel, joining it to the innermost roundel as you go, with sewings. There is Torchon ground and hearts. The hearts are coloured by the workers being a different colour, perhaps red. Again, leave the pins along the outer edge, as they will be used for sewings later. Join start to finish as before.
The outer roundel has Torchon ground, diamonds, and rose ground, with a
rose ground edge. The rose ground can be a different colour if you do a double Torchon ground where the rose ground meets the Torchon ground, as this will "bounce" the colour back into the rose ground. You can put beads between the diamonds, if you want. You can't make the diamonds a different colour, unless you change colour by adding a new pair for each diamond and removing it afterwards. Join the lace to the previous roundel with sewings. The outer edge may be loose, as the outer pair has a long way to travel. There are three possible solutions to this:
1. Twist the outermost pair several times between stitches. This will make the edge stronger.
2. When you've finished, thread a wire through the edge of the lace.
3. Sew the dreamcatcher when finished into a ring. When you sew, push the needle into pinholes, as they are strong parts of the lace, and also distribute the stress throughout the lace better,
Here is how you start the lace. The yellow can be ignored, as that is the finish of the lace.
I have tried to do the whole lace in one go, so I didn't have to do the sewings. I used a block pillow. This means that I can't leave the pins in at the start! This is the start of the working, once I had wound on all the bobbins.

In fact, I messed up the positioning of the dreamcatcher on the block pillow, so abandoned doing all of it at the same time. I cut out the middle bit (which I could do, as it involved double Torchon ground stitches, which don't travel across the lace) and carried on with the other bits. Then I worked the inner part separately, fastening it to the rest with sewings. I found it surprisingly easy to repin the lace onto the pattern to make sure everything was in the right place, both for the sew3ings, and for attaching the start to the finish. It was odd to see how the scrunched up lace sorted itself out. Perhaps I've been too fussy about this in the past!
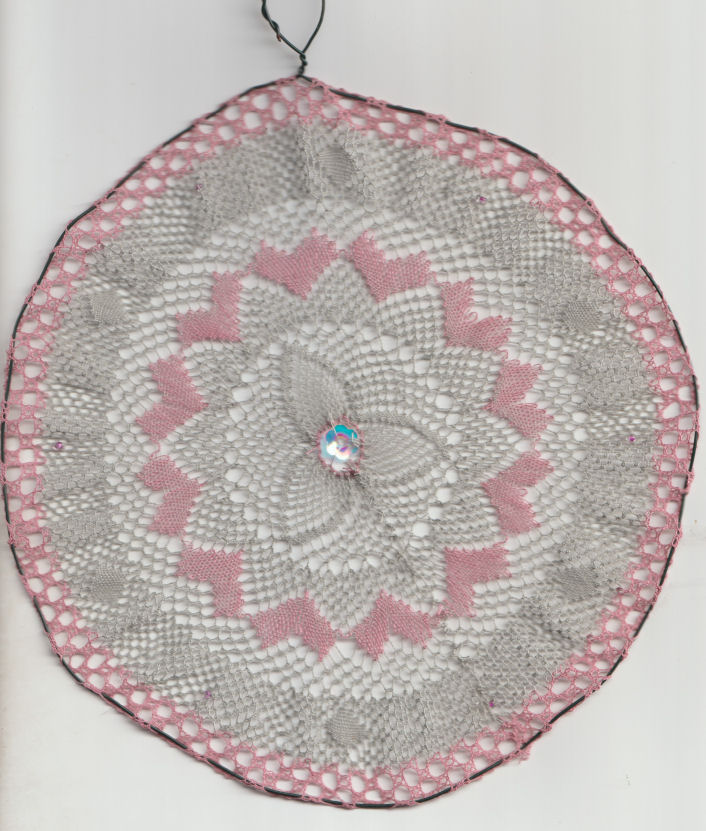
There was various finishing off to do. I found the inner hole was baggy, so I ran a single thread round it, using a needle, and tightened it, tying with a reef (square) knot. Then I sewed a sequin in the middle to fill the hole! Finally, I ran a thin garden wire (which I happened to have) round the edge to firm everything up. This could be twisted to make a suspension point. I wondered about more beads or sequins along the bottom, but decided it looked OK as it is!
Definitely more bobbins than I usually use...
Here is a larger scale photo, to see the working:

© Jo Edkins 2025 - return to lace index